
This is part 3 to the following article that blows open my camera bag. If you haven’t looked at that article yet, give it a look now here.
Here are all the articles in the series to prepare you for your next wedding.
YOU ARE HERE >> Step-by-step gear & light approach to photographing the day
I’m going to take you through each part of the wedding day and include the gear I use and some extra little info that hopefully helps. If you have any questions, as always, feel free to leave them in the comments below or DM me @tonywodarck on Instagram.
I’d never be able to shoot with so many cameras and gear without my most important part of my kit, my Holdfast Money Maker Dual Straps. If you are still using a neck strap, for the sake of your body, please upgrade now. I have a special promo code for you to get 15% off any straps (they don’t discount much since it’s a family run business, so this is the best deal you’ll find. Trust me, their products are worth it).
PROMO CODE: WODARCK2019 // https://holdfastgear.com/
This code is only valid for the first 25 users, so don’t wait on this. Also, please let me know if it doesn’t work so I can take this part down. Thanks! PS I don’t get paid by them to say this, I just love the brand.
Okay, now for the good part. Each part of the day, broken down by lens, camera body and light for digital and film.

Invite, Attire Details
Digital: 35mm + 5D Mark IV & 50mm or 85mm + 5D Mark III
Film: Contax 645 & 80mm Zeiss
Extra: Hoya macro filters
Light: Natural Light, Shade
I’ll find a cool backdrop in good even light (usually). I try and find a backdrop (table, floor, ground, chair) that ties in to the overall feel to the wedding day and is a good contrast or compliment to the colors of the invites and details. Make friends with the florist and ask for some extra flowers to add some interest to your details. If you want to get super advanced, start to create a styling kit you can bring with you. Mallory Dawn has some awesome tips on that. What’s in her styling kit, and Creating Beautiful Flatlays.

Getting Ready
Digital: 35mm + 5D Mark IV & 50mm + 5D Mark III or 85mm depending on how much room there is inside.
Film: Contax 645 & 80mm Zeiss
Light: Indoor, Window Light, Natural Light, Shade
35mm is a great focal length to tell a story, set a scene, capture a lot of the space but not too much. You can also get really close with it and there’s not too much distortion. I use this about 80% of the time for getting ready. The other 85mm lens is just to get a bit closer without making people feel uncomfortable and adding a different perspective to my photos. Window light is your friend. Ask to turn off the lights for a couple minutes or move the bride to a prettier area for touchups. Next to a window glancing out makes some beautiful soft light. The biggest thing you want to avoid is mixed light. Mixed light is like yellow/orange artificial lights and natural light through windows. It’s a pain to edit and makes skin tones unflattering. Don’t be afraid to take the person outside to get better light or a better backdrop. Have them do those final touches. Straightening the tie, putting on the cuff links, putting on their earrings.

First Look
Digital: 35mm + 5D Mark IV & 85mm + 5D Mark III & 70-200
Film: Contax 645 & 80mm Zeiss
Light: Natural light, shade is usually safest
If I have a second shooter, I’ll give them my 70-200 so they can get some good up close reaction shots over my shoulder with me out of the frame. If it’s just me, I’ll pick the 70-200 and the 35. The 70-200 is just so fast and sharp and versatile. Hard to beat for those reaction shots. Pick a spot or two to do the first look ahead of time. I take a shot on my phone or camera and show it to the bride while she’s getting ready to see if she has a preference. Just as important as getting a pretty spot with beautiful light is finding one that’s intimate. This is a super intimate moment and you don’t want the bridal party or guests in the background distracting the couple in any way.

Reception Detail Shots
Digital: 35mm + 5D Mark IV & 85mm + 5D Mark III
Film: Contax 645 & 80mm Zeiss
Light: Depends on location
Again I may throw the 70-200 on to get some cool compression but typically the 35 & 85 is enough. Tablescapes, overhead plate shots, florals, cake, guestbook. There are tons of intimate details that the couple and vendors put tons of time in deciding and creating. Try not to miss anything and try to get unique with your angles capturing these. Switch between two focal length lenses to add variety to your images.

Ceremony
Digital: 35mm + 5D Mark IV & 70-200mm + 5D Mark III, or if I have a second, I may use the 85mm and give them the 70-200. Depends on how big the venue is.
Film: Might not shoot film depending on how quick the ceremony is. I would use the Contax 645 & 80mm Zeiss if I have time.
Light: Depends on location
I really want those wide shots to set the scene with the 35mm. To get really wide shots I may do a pano of 20 photos or so using the 35mm. You can see how I do that on my instagram story under HOW-TO. I love the 70-200 to capture the facial expressions of everyone, couple, guests, bridal party. Expressions help tell so much of the story. Wait for a big laugh or someone wiping their tears or any sort of dramatic reaction. Those candid moments really help round out the story of the ceremony. Try and capture details too like the couple holding hands at the alter, Mom staring with tears in her eyes, etc.
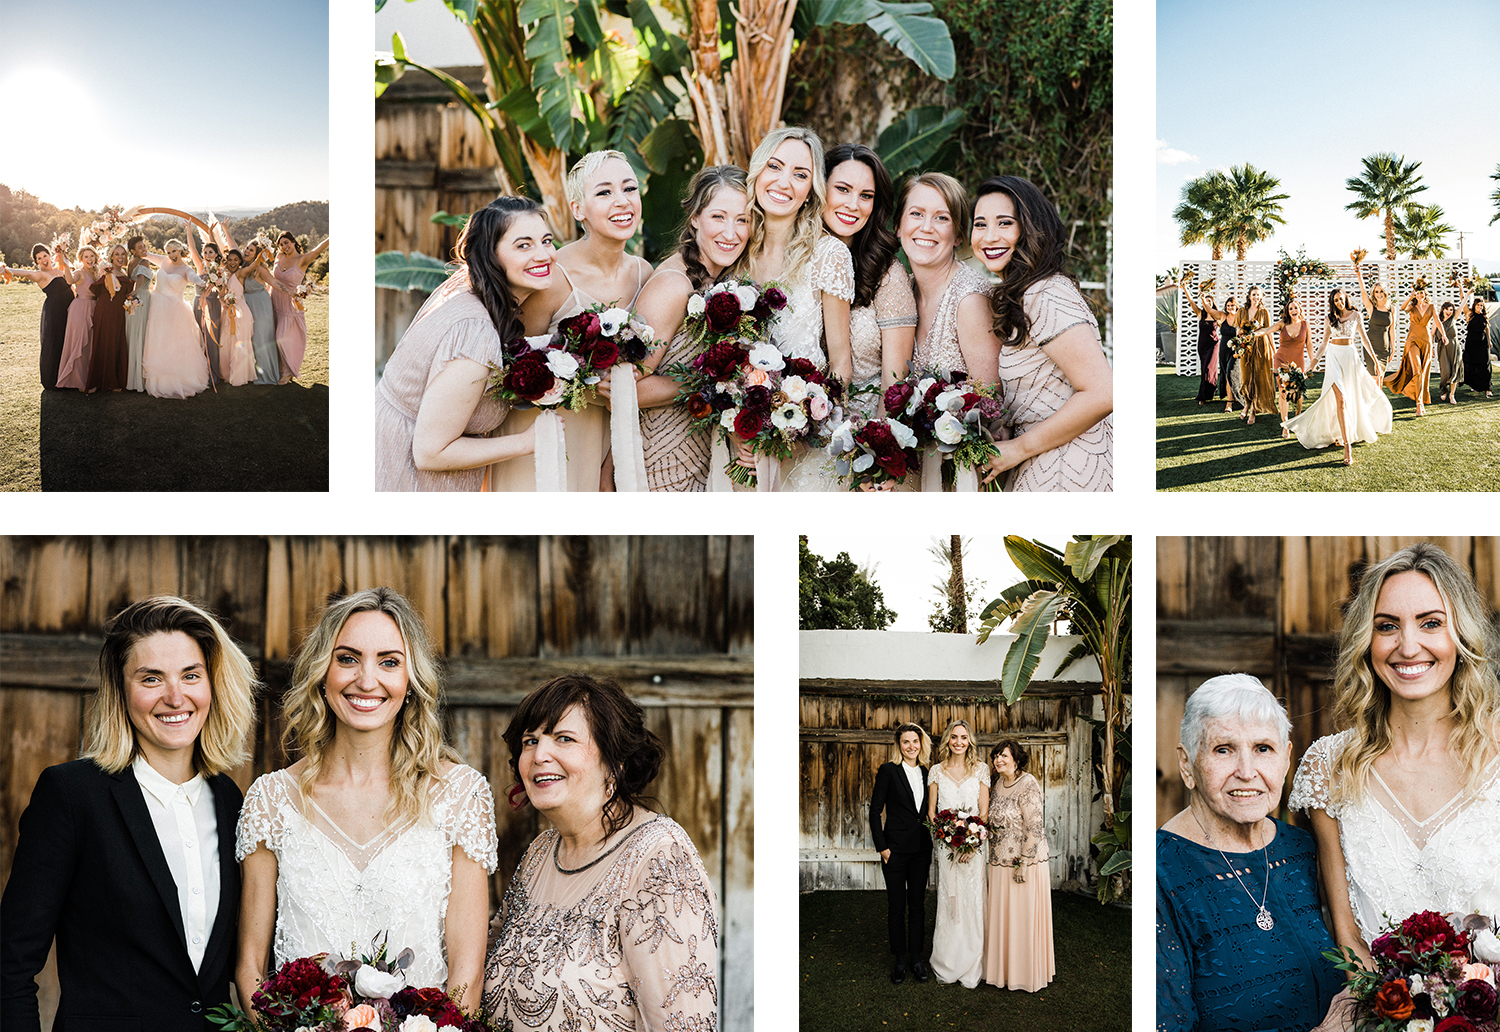
Bridal Party & Family Portraits
Digital: 35mm + 5D Mark IV & 85mm or 50mm if I don’t have much space. + 5D Mark III
Film: Depends, but would shoot with the Contax 645 or Canon EOS 3
Light: 95% of the time natural light. If it’s a winter wedding and it’s getting dark I may use two flashes at the left and the right of me aimed at the families to get some extra light.
I like to get a full body shot landscape and vertical with the 35mm and get a closeup portrait with the 85mm or 50mm. This helps give the couple two different option for each family photo and gives good variety to a usually redundant feeling part of the day. Try and shoot a couple in-between candid moments too. Those help add so much depth and make typically stiff portraits feel so much more natural. This can be a photographer’s worst part of the day and also be super energy draining for the couple. It’s up to you to plan ahead and gather a list of every family combination prior. By setting yourself up for success you’ll be a hero to the couple and keep your sanity for the rest of the day. Check out my wedding prep article if you haven’t yet to see how I properly prepare. Take 3-5 images per shot you’re trying to get to try and get one where everyone is smiling nice and everyone’s eyes are open. These are the photos that people will definitely print. It’s not the most fun part creatively, but DON’T SLACK ON THESE!

Couple Portraits AKA the best part of the day
Digital: 35mm + 5D Mark IV & 85mm or 50mm if I don’t have much space. + 5D Mark III
Film: Contax 645 & 80mm Zeiss
Light: Natural Light, hopefully golden hour if everyone did their timeline right
For this I love to have some spots around the venue already picked out and ready knowing where the light will be at the time of day we’re shooting. (Get Sun Seeker app if you don’t have it. Yes, it’s a $9.99 app. I’m cheap, but use it once and it’s worth it. Business expense). I like to try and get the couple to the spots I had picked out and direct them. I continue to shoot through the process of getting them there, moving to different spots, and as I’m directing, snapping away the entire time. Shooting those moments in-between helps to have them in beautiful scenes but those candids add so much more to the posed moments. Consider trying to vary the distance of your couple In your composition as you go through shooting this part of the day. Meaning close up shots, full body portraits, and really pulled back shots. This variety will help give a lot more depth to your gallery and help tell more of the story to the day.

Reception
Digital: 35mm + 5D Mark IV & 85mm + 5D Mark III
Film: Canon EOS 3 + 50mm
Light: On-Camera Flash with magmod sphere flash diffuser.
I have multiple flashes, multiple magmod spheres, light stands, two 26” soft boxes, but honestly, I like being nimble more than I like all that extra stuff. 95% of the time I’m throwing a flash on and I’m dancing my way through the reception. For the bouquet toss, garter toss, cake cutting, work with the coordinator prior and help direct where they’ll be for optimum lighting. Test your settings and be ready, then let the coordinator know you’re good to go to the next step. For speeches, it helps to get wide and closeup too, always try and very your distances with your lenses or by moving your feet. Don’t forget about the reactions either. To be totally honest, nighttime reception continues to be my weakest part of my portfolio. If you want to learn a lot about good cinematic lighting for wedding photography join this group: Steel and Flint Society: Wedding photography education-Esteban Gil
That’s it! That’s my go-to formula for most weddings. Did you learn something? Am I missing some secret spice to the recipe? I love any and all feedback. Please give me a shout in the comments below or DM me at @tonywodarck.
Thanks!
Here’s the next article:
LATEST EDUCATION ARTICLES


A visual breakdown of lighting & composition to help you take better photos.